TABLE OF CONTENTS
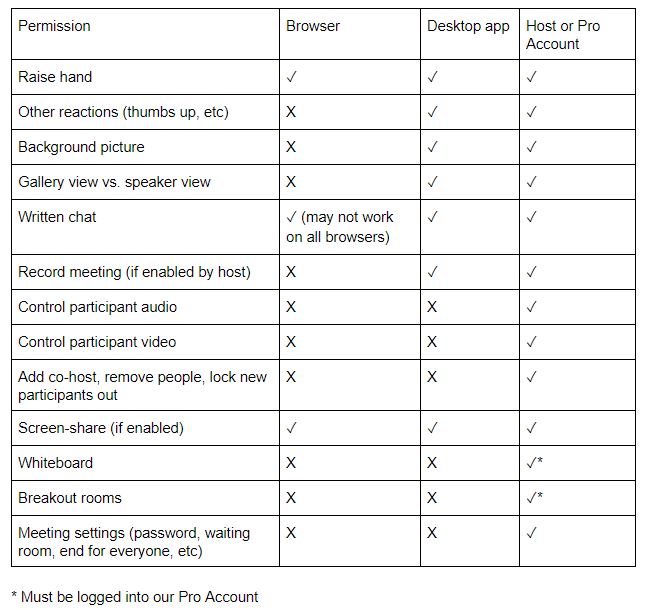
- Permissions overview
- Desktop app and Pro account
- Settings
- Scheduling a meeting / waiting room
- Viewer options
- Controlling audio
- Controlling video
- Controlling chat
- Other controls
- Record
- Screenshare and whiteboard
- Breakout rooms
- Using Google docs
Permissions overview
Desktop app and Pro account
To be able to fully use our account’s Zoom functions, you must:
1) be using the Zoom desktop app (rather than Zoom via a browser).
2) have the latest version of the Zoom desktop app
3) be logged into the AV pro account, OR be added as a host
If you’re looking for but cannot find certain features on Zoom, it may be because you are not meeting one of three qualities above.
Our Zoom account can only host one meeting at a time, and the number of participants is limited to 100.
Settings
Zoom has a ton of meeting settings that can be controlled by opening the Zoom desktop app, clicking your initials in the top right corner, and navigating to SETTINGS.

Under GENERAL, you can click VIEW MORE SETTINGS.
A browser window should open. These settings should allow you to control (among other things):
- Whether the meeting is allowed to start before the host joins
- Whether a meeting password is required
- Whether users must be authenticated
- If participants should start the meeting muted
- Whether chat, co-host, screenshare, nonverbal feedback (thumbs up/down, etc), whiteboard, breakout rooms are enabled
- Whether the meeting should have a waiting room and manual one-by-one admission of participants
- Whether participants can join a meeting if it’s already in progress
SCHEDULING A MEETING / WAITING ROOM
Using this same Desktop app start screen, you can start a NEW MEETING immediately, or SCHEDULE a meeting for anytime in the future.

When SCHEDULING a meeting, you can toggle ADVANCED OPTIONS to enable a WAITING ROOM, or force your users to AUTHENTICATE.
Forcing users to sign into Zoom may help you ensure that users are who they say they are, but some participants may not want to go through the trouble and may decide not to join your presentation.

If you have created a WAITING ROOM, you’ll be able to click on the PARTICIPANTS button (on the bottom bar) and see everyone in the waiting room. You can then admit them individually, or all at once, into the main call.

Viewer options
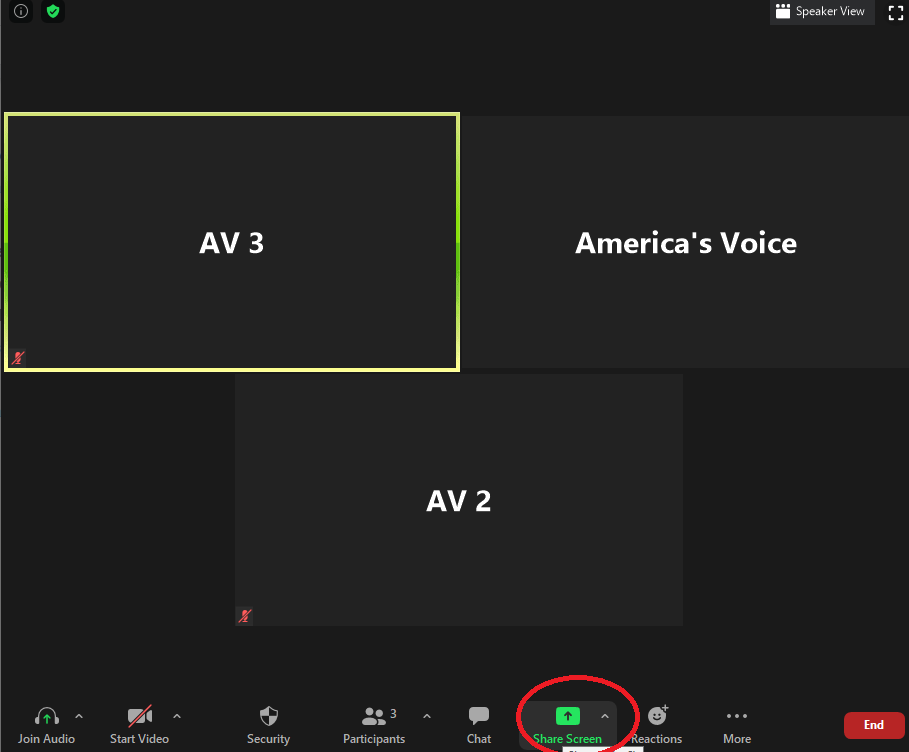
Once a meeting has started, you can toggle between SPEAKER VIEW and GALLERY VIEW by clicking in the top right corner of the screen. This toggle only works if you are using a desktop app and not Zoom in a browser.
You can open the PARTICIPANTS list and the CHAT bar by clicking the buttons on the bottom.

Controlling audio
To forcibly mute all participants, go to the SECURITY button and uncheck the ability for participants to UNMUTE THEMSELVES. If you are not running the latest version of Zoom, you may not be able to see this option.

All participants trying to unmute themselves will be told they do not have that permission. (They’ll have to type in the chat or use the RAISE HAND icon to get your attention.)
You can then manually ASK TO UNMUTE individuals by hovering over their display screen, or where their name is shown in the PARTICIPANT LIST.

NOTE that you cannot actually unmute a participant from your end; you can only give them the permission to unmute themselves. So, if you start a meeting with everyone forcibly muted and you want to unmute someone, you can only give them the permission to unmute themselves. They will still have to click their own UNMUTE button before speaking.
Controlling video
Zoom does not appear to allow hosts to mass-control whether participants are able to turn on their videos. You can, however, turn off participant video one by one. Find a participant in the PARTICIPANT LIST (same as AUDIO, see above) and hosts will have the option to STOP VIDEO for individual participants.
SIDE BY SIDE: You can create a two-pane side-by-side speaking format no matter how many participants are in the event. First, you must STOP VIDEO for each participant whom you don’t want displayed. Then, hover over the video of any participant and click HIDE NON-VIDEO PARTICIPANTS.
CONTROLLING CHAT
By opening up the CHAT tab and clicking on the (•••) option, you can control whether participants are able to chat with everyone, chat with the host only, or chat at all.
Note that only the HOST has the power to control this. And if you only allow participants to chat with the host, even the co-host will not be able to see chats.
Zoom also has “non-verbal feedback” options such as RAISE HAND, but it’s not possible to selectively turn those off (i.e. it’s not possible to make it so that only hosts can see raised hands).

Other controls
Using the SECURITY button at the bottom, you can also REMOVE a participant or LOCK THE MEETING so that no one new can join.
By hovering over individual participants, you can make them the HOST or CO-HOST. CO-HOST has only of the powers of the HOST; they don’t have access to the WHITEBOARD or BREAKOUT ROOM, and they can’t see host-only chats. Therefore, the person running the back end of any Zoom meeting or training should have HOST status.

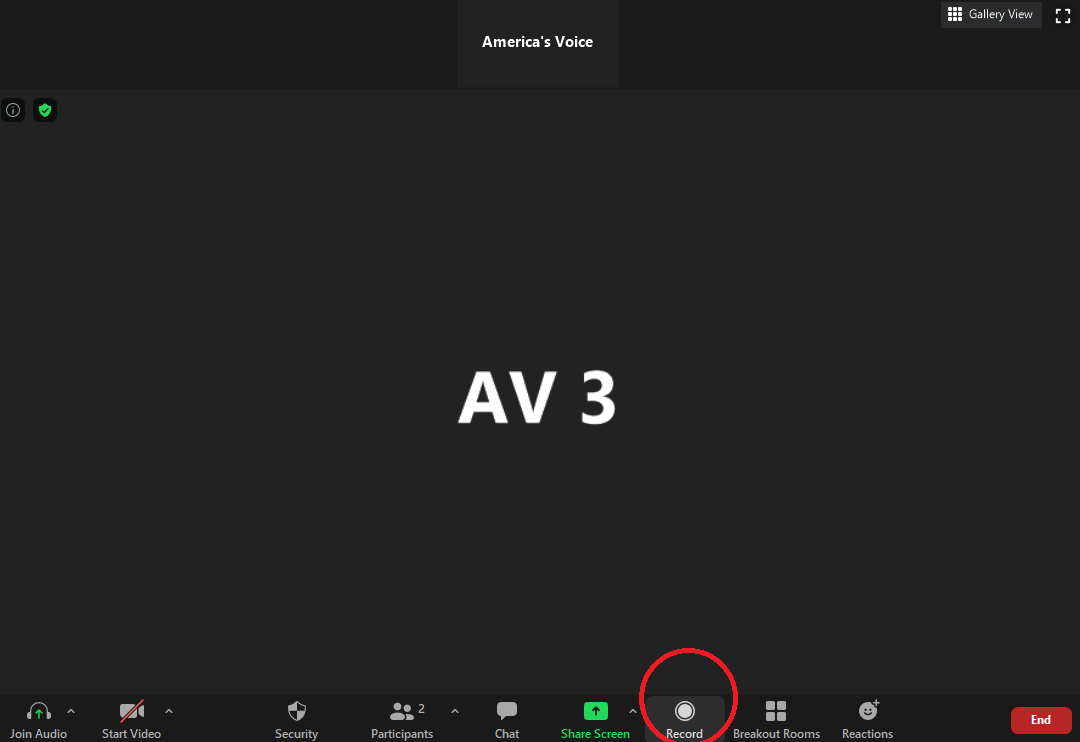
Record
You can record the meeting by hitting RECORD in the bottom bar. For security reasons, it is preferable for you to choose RECORD TO COMPUTER. When the meeting is over, a popup will ask where on your computer you want your files saved. (You may be asked to upload the video to AV’s Google Drive later.) Zoom will automatically provide you with 1) the video recording, 2) a copy of any text chats sent, 3) a recording of the audio only.
You can record videos from inside breakout rooms as well (which will be separate from the main video), but the host must give individual participants permission to record first. (This is done in the PARTICIPANTS list, and must be done before the breakout starts.) These breakout room videos cannot be saved or viewed until after the whole event is over.
Screenshare and whiteboard
SCREENSHARE is another button accessed from the bottom toolbar.
If you want meeting participants to hear your audio while you are screensharing (for example, if you are playing a video during a screenshare, check off the SHARE COMPUTER SOUND option at the bottom of the popup window.
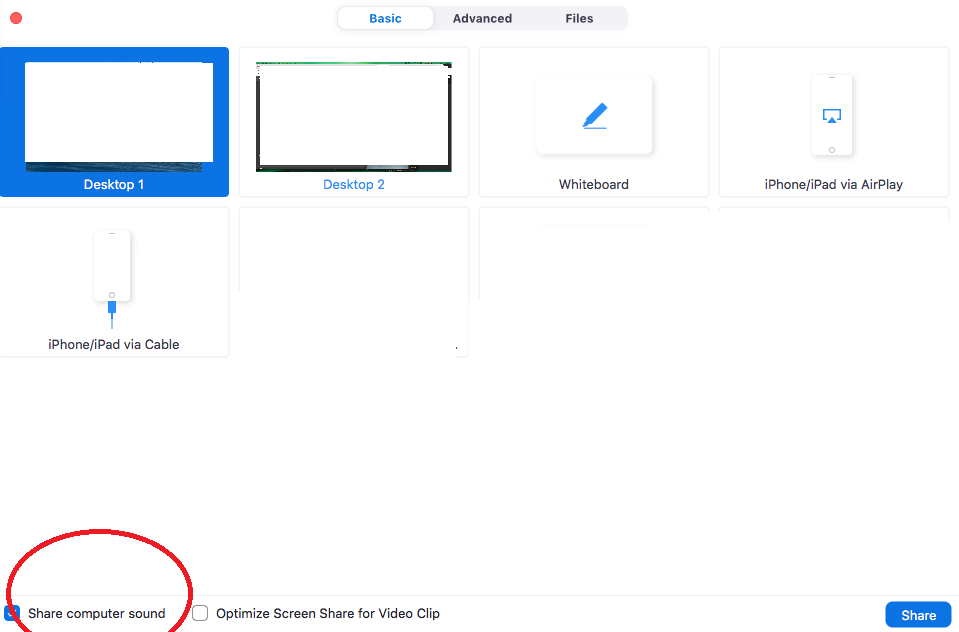
There is a built-in WHITEBOARD in Zoom that is considered a form of screenshare.
If you click on the SCREENSHARE button, you’ll have a choice of whether you want to start sharing your screen or start a new WHITEBOARD.
Our account currently gives ALL participants the ability to screenshare. This can be changed in SETTINGS or using the SECURITY button. Only the host, however, is able to start a concurrent screenshare if someone else is already screensharing.
If you start a WHITEBOARD, only the host will be able to write on the whiteboard. Zoom has an option to save the whiteboard. If you want multiple people to be able to write on a whiteboard, you’ll have to create a Google Doc and screenshare (as well as share the link to) that.
To end the screenshare, click on the STOP SHARE bar that should be hovering at the top of the screen.
![]()
Breakout rooms
Start a BREAKOUT ROOM by clicking on the button at the bottom. A popup will ask you how many rooms you want, and whether you want people to be sorted AUTOMATICALLY (i.e. randomly) or MANUALLY.

Once you’ve hit CREATE ROOMS, another popup will appear.
Under OPTIONS, you can choosen how long the breakout will last, whether participants are allowed to leave the breakout rooms early, and how much warning time participants are given as the end of the breakout approaches.
You must hit OPEN ALL ROOMS for the breakout to start.

If you chose to MANUALLY sort breakout participants, you’ll be asked to sort individual participants into the rooms you’ve created. This is useful if we are conducting a training and we want there to be a staff member helping to facilitate in every room. To start the breakout, hit OPEN ALL ROOMS.

Once you’ve started the rooms, you cannot add rooms without closing all the rooms first. So, if you’re unsure how many rooms you’ll need (or if one breakout room needs to start slightly earlier than the others), create more rooms than you think you’ll need and assign participants as you go.
Using Google Docs or Google Presentations as a participation tool
In our June Zoom training, the trainers used Google Presentations to ask participants to input thoughts into lists, sticky notes, etc. A similar template can be built for you if you are interested.
If you’d like to keep participation anonymous, share the document so that anyone with the link has the power to edit.
If you’d like to see who is editing where, you must share the document using each individual participant’s email address, and limit editing only to those who have been shared in.
###